개발을 하다 보면 x, y좌표나 콘텐츠의 사이즈를 구해야 할 때가 있습니다.
그럴 때는 measure, measureInWindow, measureLayout을 사용하시면 됩니다.
각 함수들의 정의부터 살펴본 후 코드와 이미지로 설명 이어가겠습니다.
measure(callback)
boxRef.current.measure((x, y, width, height, pageX, pageY)=> {})콜백 함수는 x, y, width, height, pageX, pageY를 인자로 받습니다.
- x, y -> 자신의 부모 기준으로 x, y 좌표를 가져옵니다.
- width, height -> 가로, 세로를 길이를 가져옵니다.
- pageX, pageY -> 화면상의 x , y 절대 좌표를 가져옵니다.
measureInWindow(callback)
boxRef.current.measureInWindow((x, y, width, height)=> {});콜백 함수는 x, y, width, height를 인자로 받습니다.
- x, y-> 화면상의 x , y 절대 좌표를 가져옵니다.
- width, height -> 가로, 세로를 길이를 가져옵니다.
measureLayout(relativeToNativeComponentRef, onSuccess, onFail)
boxRef.current.measureLayout(boxTwoRef.current, (x, y, width, height) => {
}, () => console.log("chat error"))

// 자식.measureLayout(부모,  onSuccess, onFail)
두 콘텐츠 간의 거리를 구해오고 자신의 사이즈를 얻어옵니다.
첫 번째 인자에서는 자신의 부모 중 하나를 지정합니다.
onSuccess는 콜백으로 x, y, width, height를 인자로 받습니다.
- x, y-> 지정한 부모와 자식간의 x , y 좌표를 가져옵니다.
- width, height -> 가로, 세로를 길이를 가져옵니다.
onFail은 실패했을 때입니다.
measureLayout은 아래에서 쫌 더 설명드리겠습니다.
코드
이제 코드를 통해 더 자세히 알아보겠습니다.
const Measure = (props) => {
    const boxRef = useRef();
    const boxTwoRef = useRef();

    useEffect(() => {
        getBoxMeasure();
    }, []);

    const getBoxMeasure = () => {
        boxRef.current.measure((x, y, width, height, pageX, pageY)=> {
            console.log("measure == ")
            console.log("x : ", x);
            console.log("y : ", y);
            console.log("width : ", width);
            console.log("height : ", height);
            console.log("pageX : ", pageX);
            console.log("pageY : ", pageY);
        })

        boxRef.current.measureInWindow((x, y, width, height)=> {
            console.log("measureInWindow ==")
            console.log("x : ", x);
            console.log("y : ", y);
            console.log("width : ", width);
            console.log("height : ", height);
        });

        boxRef.current.measureLayout(boxTwoRef.current, (x, y, width, height) => {
            console.log("measureLayout ==")
            console.log("x : ", x);
            console.log("y : ", y);
            console.log("width : ", width);
            console.log("height : ", height);
        }, () => console.log("chat error"))

    };


    return(
        <SafeAreaView style={styles.container}>
            <View ref={boxTwoRef}
                  style={{
                  position:"absolute",
                  top:50, left:50,
                  padding:10,
                  backgroundColor:"blue"
                  }}
              >
                <View style={{backgroundColor:"green", padding:20,}}>
                    <View ref={boxRef}
                    	style={{
                        backgroundColor:"red",
                        width:100,height:100,}}
                     >
                    </View>
                </View>
            </View>

            <TouchableOpacity style={styles.buttonWrap} onPress={getBoxMeasure}>
                <Text>get measure</Text>
            </TouchableOpacity>
        </SafeAreaView>
    )
};
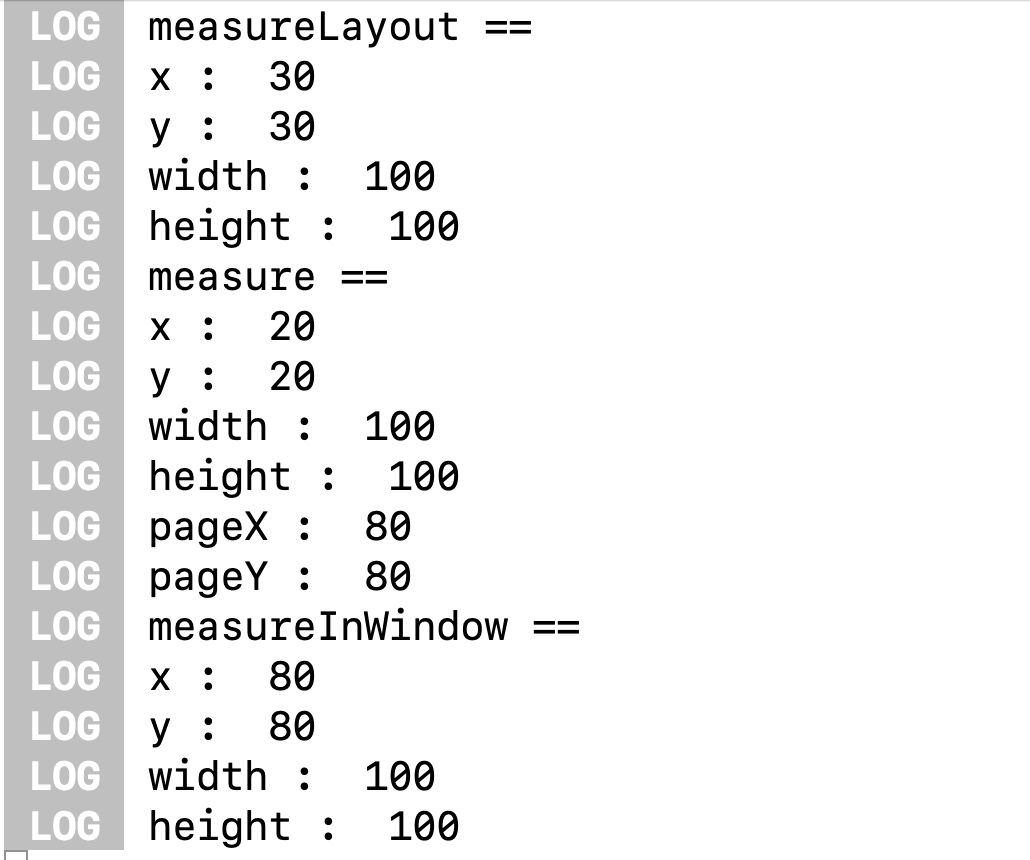
getBoxMeasure 함수를 호출하면 각 함수에 맞는 인자들이 콘솔에 찍히도록 하였습니다.
맨 처음 useEffect에서 호출하였을 때는 모두 0값이 찍혔습니다.
이는 렌더 되기 전에 측정하기 때문입니다.
만약 가능한 빨리 측정하고 싶고, 절대좌표가 필요 없다면 onLayout 속성을 사용하시면 됩니다.
또한 measure에서 나오는 width, height 값은 뷰포트 기준이므로 실제 크기를 알고 싶으면 onLayout 속성을 사용하시면 됩니다.
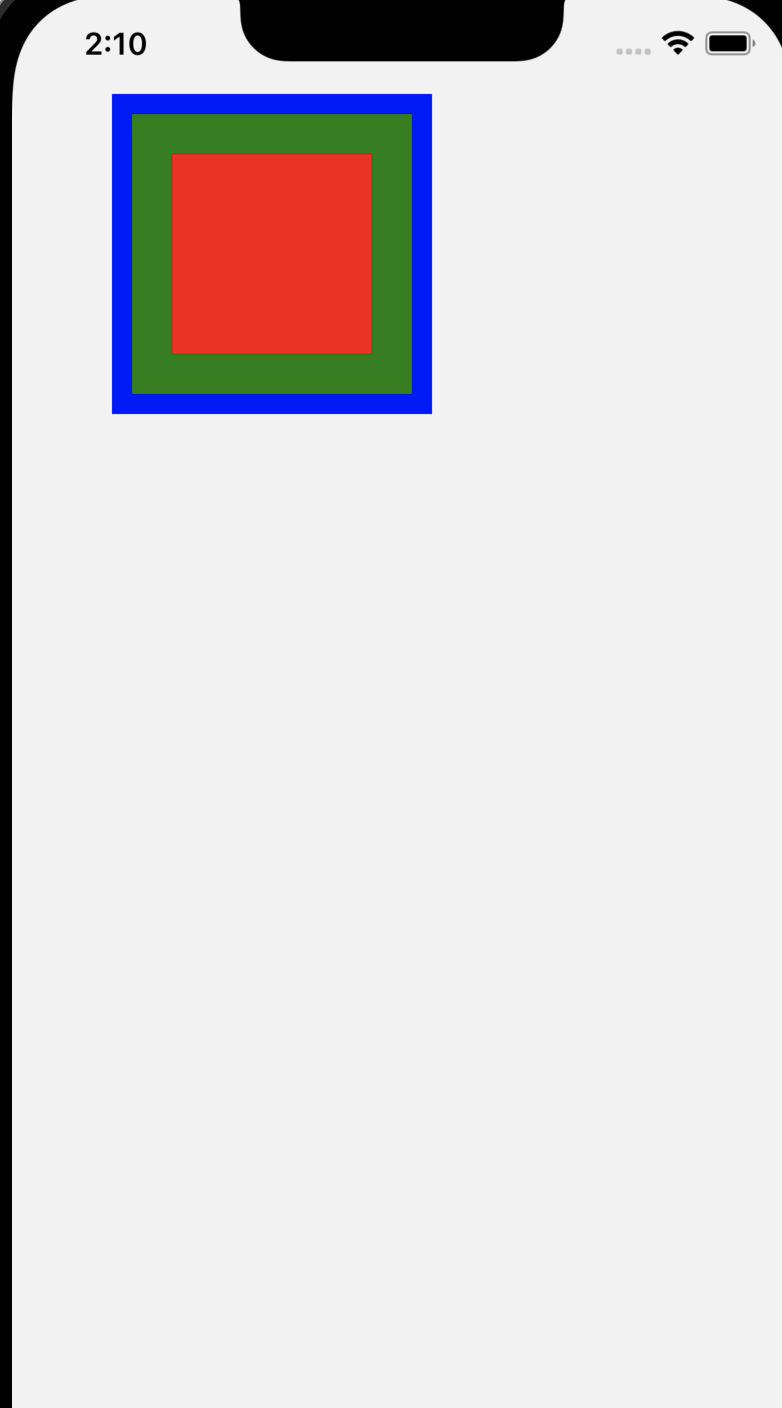
이제 모두 렌더링 된 후 get Meaure를 클릭하여 측정해 보겠습니다.

보시는 바와 같이 measure()은 자신의 바로 밖에 있는 부모를 기준으로 측정을 합니다.
measureInWindow()는 부모와 상관없이 절대 좌표를 가져옵니다.
measueLayout은 설정한 두 개의 ref를 기점으로 측정합니다.
만약 부모 자식의 기준이 아닌 다른 곳에 있다면 오류가 납니다.
또한 코드에서 보시면 알 수 있듯 설정한 부모&자식 사이에 여러 개의 태그가 있거나 멀리 떨어져 있어도
안과 밖의 관계가 명확하다면 사용 가능합니다.
참고 : https://reactnative.dev/docs/direct-manipulation#measurecallback
Direct Manipulation · React Native
It is sometimes necessary to make changes directly to a component without using state/props to trigger a re-render of the entire subtree. When using React in the browser for example, you sometimes need to directly modify a DOM node, and the same is true fo
reactnative.dev
'Front-end > React Native' 카테고리의 다른 글
| React Native dynamic image (동적 이미지 변경) (1) | 2022.02.13 |
|---|---|
| React Native 역무한스크롤 구현하기 (채팅) (0) | 2022.02.12 |
| React Native 무한스크롤 구현하기 (0) | 2022.02.09 |
| React Native Navigation 스크린 이동 (0) | 2022.02.01 |
| React Native Navigation 구조 잡기 (Nesting navigators) (0) | 2022.01.31 |